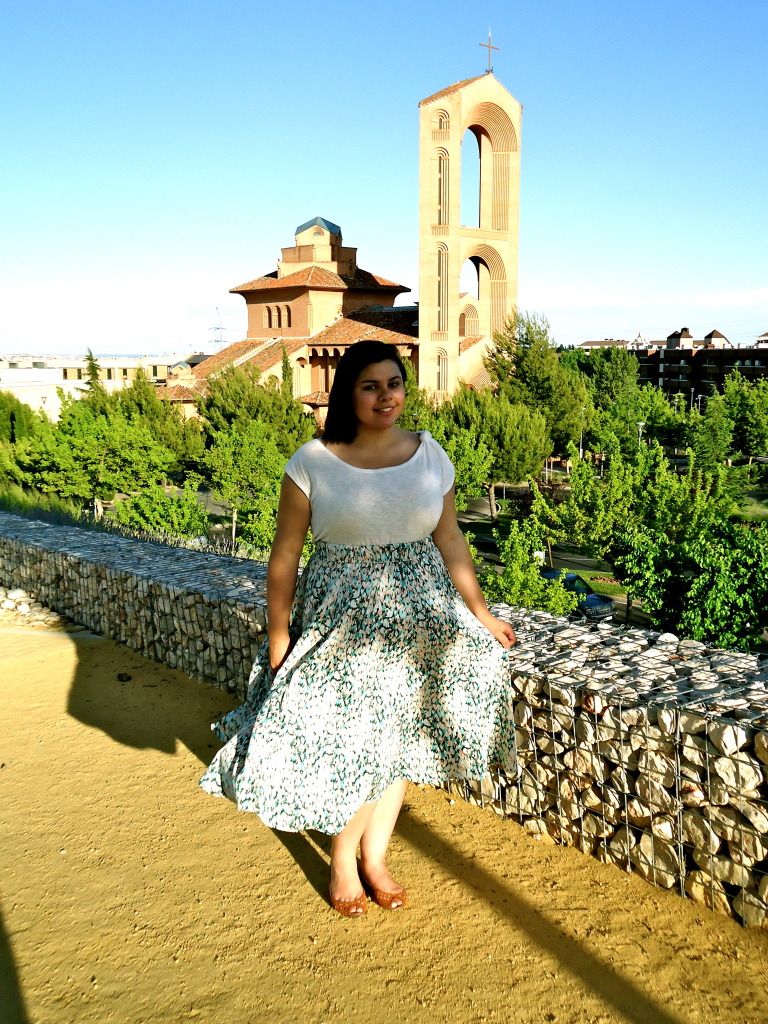
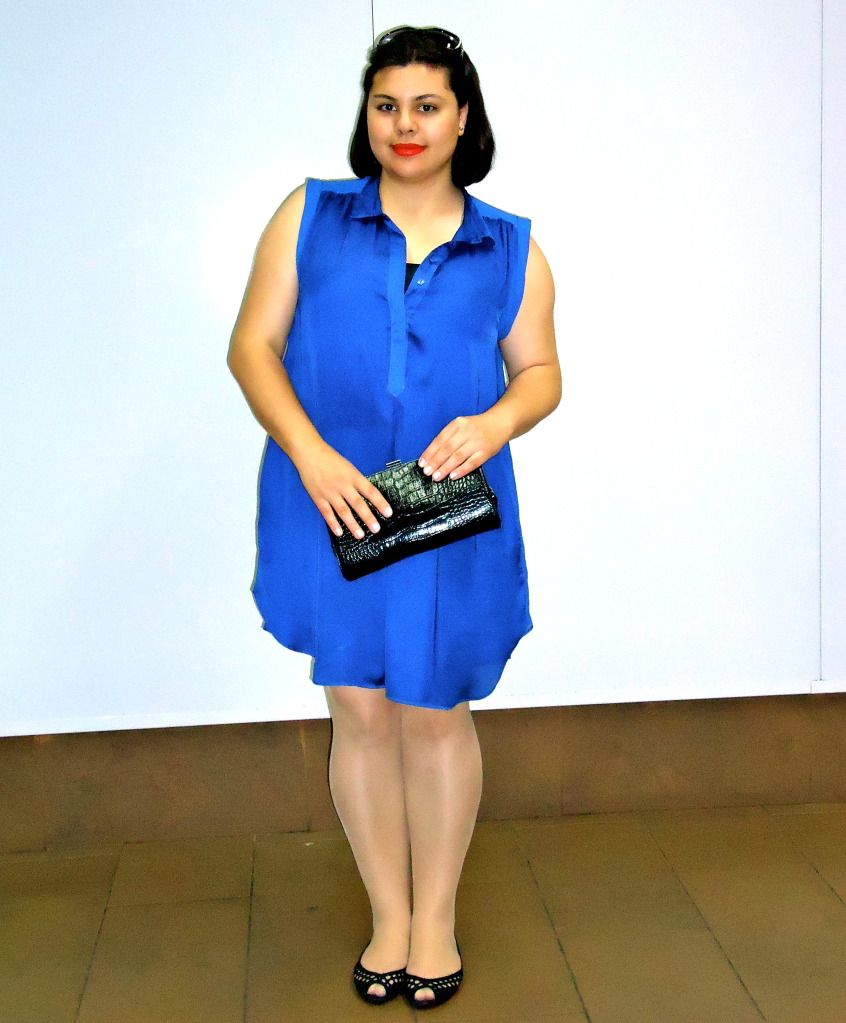
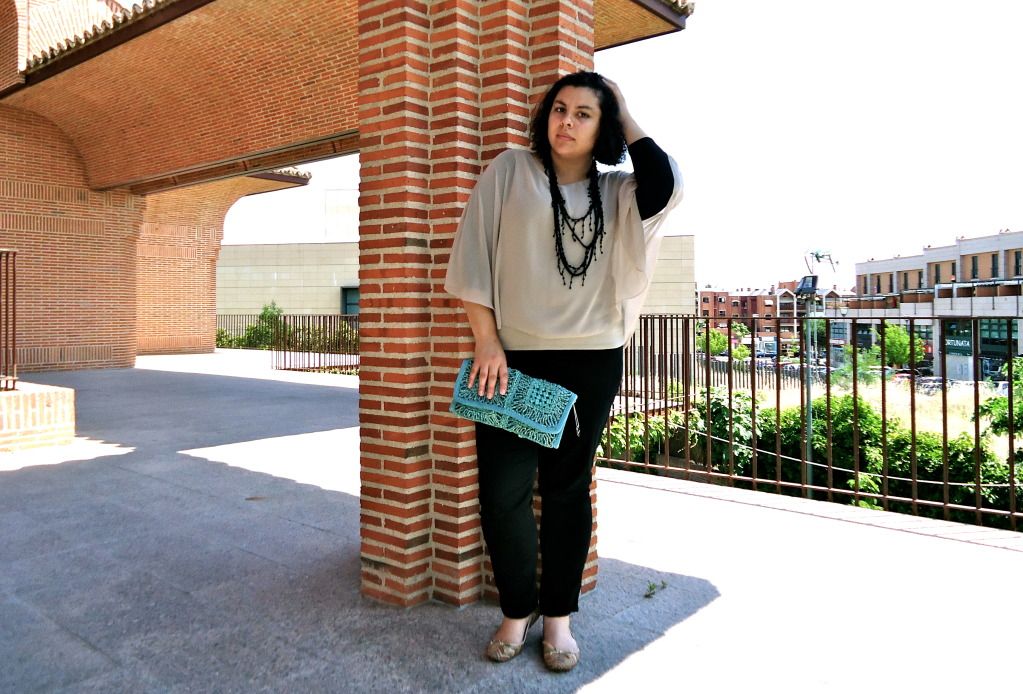
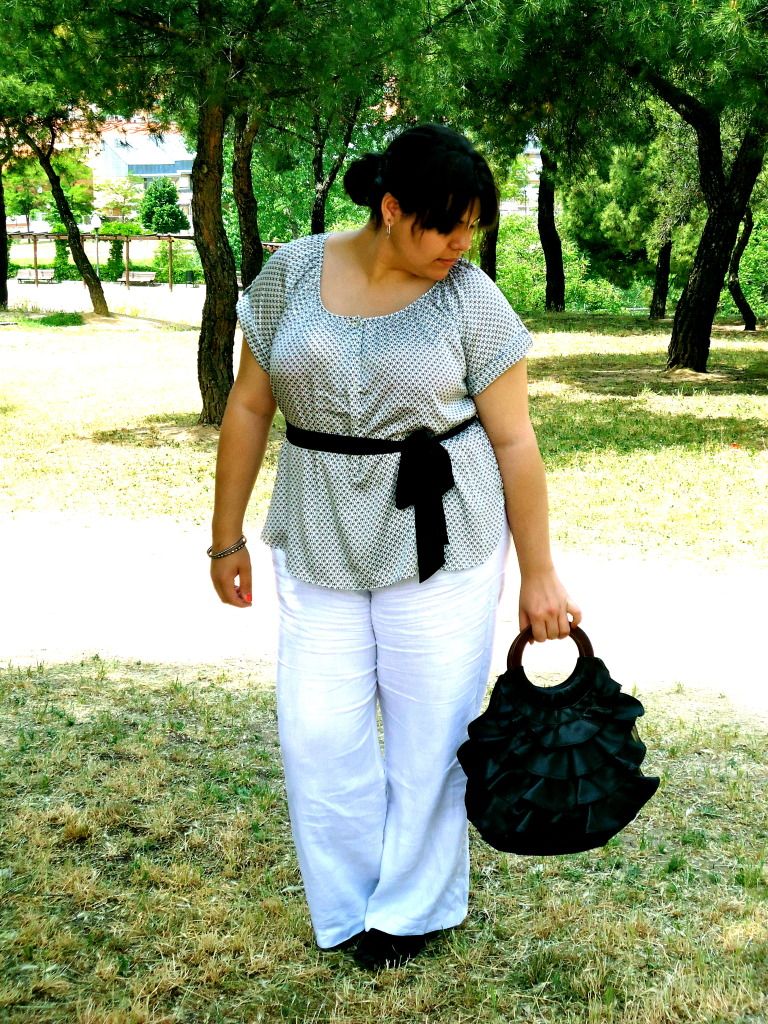
Em altura de exames e de muito estudo, a verdade é que não há grande tempo para tomarmos conta de nós próprias e a vontade de nos arranjarmos também começa a diminuir devido ao cansaço e ao pouco tempo que nos sobra. A verdade é que vagueamos da faculdade para casa, de casa para a biblioteca e pelo caminho vamo-nos atirando para qualquer cama, sofá ou cadeira que nos pareça minimamente confortável. Assim, e como devemos e temos de estar bonitas todos os dias, aqui vão alguns truques que utilizo nestas épocas que permitem poupar tempo e estar minimamente arranjada.
In
time for exams and much study, the truth is that there is not much time
to take care of ourselves and our will for doing that
decreases due to fatigue and the little time we have left. The
truth is that we wandered from college to home, from home to the library
and by the way we let us shooting for any bed, sofa or chair that appears
in minimally comfortable. Thus,
as we should and we must be beautiful every day, here are some looks
and tricks I use these times to save you time and be minimally arranged.
Roupa:
O truque aqui é escolher roupas confortáveis, que sejam fáceis de conjugar mas que tenham um toque especial ou um brilho diferente, de forma tentarmos dar algo de diferente e sofisticado ao nosso look de forma simples e rápida. Mantenham-se longe das sweaters/camisolas de treino que tanto apetece vestir! Apostem em acessórios. Se colocarem uns brincos, uma pulseira e um colar, o que na verdade nem 1 minuto demora,o vosso look fica super composto e não parecem de todo desleixadas!
Clothing:
The
trick here is to choose comfortable clothes that are easy to combine
but have a twist or a different glow, so try to give something different
and sophisticated to your look in a simple and quick way. Stay away from sweaters/sweatshirts training that both fancy dress! Bet on accessories. If you put some earrings, a bracelet and a necklace, which is actually not
one minute delay, your look is super composed and did not seem at all
sloppy!
Cabelo:
Nesta altura o tempo para arranjar o cabelo é passado com a cabeça entre os livros portanto usem apanhados simples, ou o cabelo solto com por exemplo um gancho ou uma bandolete que marque a diferença. Por um lado, vão manter o vosso cabelo longe dos livros e por outro é simples e muito rápido!
Hair:At
this point the time to fix your hair is past your head between books so
caught using simple or loose hair with such a hook or a headband that
marks the difference. On the one hand, will keep your hair away from the books and on the other is very simple and fast!
Maquilhagem:
A verdade é que acabamos sempre por passar este passo, mas de certeza que se perderem 2 minutos a colocar uma base e um pouco de blush, ficam com um ar muito mais radiante. (desgraçadas aquelas que permanecem sempre impecáveis e não precisam de a colocar mesmo durante a época de exames)
Makeup:The
truth is that we always end up passing this step, but I'm sure that if you lose 2 minutes putting a cream a little bit of blush, you will end up with an air much
more radiant. (Unfortunate ones that always stay clean and do not need to place nothing even during the time of examinations)
Um outro truque muito importante, senão o mais importante é sorrir e tentar andar bem disposta, a verdade é que isso resulta muito mais do que qualquer outro truque de beleza e para além de nos fazer parecer maravilhosas, vai-nos dar muito mais animo para continuar a estudar todos os dias!
Another
trick very important, but the most important is to smile and try to
walk well prepared, the truth is that this results more than any other
trick of beauty and beyond to make us look beautiful, will give us much more cheer to continue studying every day!
Mostrar mensagens com a etiqueta dicas e truques. Mostrar todas as mensagens
terça-feira, 29 de janeiro de 2013
quarta-feira, 29 de agosto de 2012
Pedicure caseira!
Ter uns pés impecáveis é algo que todas nós gostamos e que é muito importante, não só, mas principalmente no verão. Muitas de nós optam por ir à esteticista para o fazer, mas para aquelas que preferem poupar algum dinheiro e fazê-lo em casa, este é o método que costumo utilizar e dá bastante resultado. Ficam então algumas dicas para o fazerem!
Pedicure:
- encher uma bacia com água quente (o mais quente que conseguirem aguentar) e deitar um pouco de sal na água;
- quando a água começar a ficar fria retira os pés da água e limpa-os com uma toalha macia;
- retira os restos de verniz das unhas com um algodão e dissolvente (de preferência sem acetona);
- corta as unhas e lima-as caso necessário. As pontas devem ficar redondas para evitar que as unhas encravem!;
- volta a colocar os pés na água;
- depois de retirar o excesso de água passa uma lima própria para os pés ou uma pedra pomes nos calcanhares, base do pé e algumas calosidades que possam existir;
- puxa para baixo as cutículas, mas não as retires sozinha, podem criar-se feridas! Procura um profissional quando o desejares fazer;
- coloca um pouco de creme. Existem cremes próprios mas se não tiveres nenhum especifico para os pés o teu creme hidratante de corpo serve na perfeição!
- escolhe um verniz que gostes e pinta as unhas (duas camadas e no final uma de verniz capa, se desejares);
- para pintar as unhas utiliza um separador de dedos ou se não tiveres utiliza um lenço de papel ou um pouco de papel higiénico. O efeito é o mesmo!
- deixa secar o verniz pelo menos uma hora antes de calçar sapatos fechados pois o pé fica húmido, o verniz amolece e fica tudo estragado!
Divirtam-se!
To Have an impeccable feet is something that all we like and that is very important, not only, but mainly in the summer. Many of us opt to go to beautician to do this, but for those who prefer to save some money and do it at home, this is the method I usually use and gives enough result. Get some tips for doing so!
Pedicure:
-fill a basin with hot water (as hot as they can endure) and pour a little salt in the water;
-When the water starts getting cold remove the feet of water and clean them with a soft towel;
-remove the remains of nail varnish with a cotton pad and solvent (preferably without acetone);
-cut nails and file them if necessary. The tips should get round to avoid that pesky fake nails!;
-back to put your feet in the water;
-After removing the excess water passes a file itself to the feet or a pumice stone in heels, foot base and some calluses that may exist;
-pulls down the cuticles, but not the retires alone, can create wounds! Looking for a professional when you wish to make that;
-put a little cream. There are creams own but if you don't have any specific to feet your moisturizing cream body serves to perfection!
-Choose a varnish you like and paint your nails (two layers and at the end a varnish cover, if you wish);
-to paint the nails uses a finger tab or if you don't have use a tissue or a bit of toilet paper. The effect is the same!
-Let dry varnish for at least an hour before wearing closed shoes because the foot is humid, the varnish will soften and everything is spoiled!
Join the fun!
Dream Girl
Pedicure:
- encher uma bacia com água quente (o mais quente que conseguirem aguentar) e deitar um pouco de sal na água;
- quando a água começar a ficar fria retira os pés da água e limpa-os com uma toalha macia;
- retira os restos de verniz das unhas com um algodão e dissolvente (de preferência sem acetona);
- corta as unhas e lima-as caso necessário. As pontas devem ficar redondas para evitar que as unhas encravem!;
- volta a colocar os pés na água;
- depois de retirar o excesso de água passa uma lima própria para os pés ou uma pedra pomes nos calcanhares, base do pé e algumas calosidades que possam existir;
- puxa para baixo as cutículas, mas não as retires sozinha, podem criar-se feridas! Procura um profissional quando o desejares fazer;
- coloca um pouco de creme. Existem cremes próprios mas se não tiveres nenhum especifico para os pés o teu creme hidratante de corpo serve na perfeição!
- escolhe um verniz que gostes e pinta as unhas (duas camadas e no final uma de verniz capa, se desejares);
- para pintar as unhas utiliza um separador de dedos ou se não tiveres utiliza um lenço de papel ou um pouco de papel higiénico. O efeito é o mesmo!
- deixa secar o verniz pelo menos uma hora antes de calçar sapatos fechados pois o pé fica húmido, o verniz amolece e fica tudo estragado!
Divirtam-se!
***
To Have an impeccable feet is something that all we like and that is very important, not only, but mainly in the summer. Many of us opt to go to beautician to do this, but for those who prefer to save some money and do it at home, this is the method I usually use and gives enough result. Get some tips for doing so!
Pedicure:
-fill a basin with hot water (as hot as they can endure) and pour a little salt in the water;
-When the water starts getting cold remove the feet of water and clean them with a soft towel;
-remove the remains of nail varnish with a cotton pad and solvent (preferably without acetone);
-cut nails and file them if necessary. The tips should get round to avoid that pesky fake nails!;
-back to put your feet in the water;
-After removing the excess water passes a file itself to the feet or a pumice stone in heels, foot base and some calluses that may exist;
-pulls down the cuticles, but not the retires alone, can create wounds! Looking for a professional when you wish to make that;
-put a little cream. There are creams own but if you don't have any specific to feet your moisturizing cream body serves to perfection!
-Choose a varnish you like and paint your nails (two layers and at the end a varnish cover, if you wish);
-to paint the nails uses a finger tab or if you don't have use a tissue or a bit of toilet paper. The effect is the same!
-Let dry varnish for at least an hour before wearing closed shoes because the foot is humid, the varnish will soften and everything is spoiled!
Join the fun!
Dream Girl
quinta-feira, 26 de julho de 2012
Big girls don't cry... and do not use leggings!
Eu sei que pode parecer estranho, as pessoas devem usar aquilo com que se sentem confortáveis, mas isso não significa que podem usar tudo o que lhes apetecer. Nem tudo nos assenta bem, temos de ser realistas e já há algum tempo fui confrontada no metro com uma rapariga que apesar de ter alguns quilinhos a mais, era bastante gira, mas o facto de estar a usar umas leggins brancas, que lhe ficavam super justas e quase transparentes, como se fossem calças bem incomodou-me um bocadinho e se fosse eu sinceramente gostava que me dissessem "isso não te fica nada bem!" e que as atirassem para o lixo. Oiço imensa gente dizer "leggings are not for big girls" e bem, é verdade. A roupa pode ser um grande aliado mas também um grande inimigo e vos garanto que se souberem escolher bem o que vestem e o que usam vão arrasar de certeza. Big girls are beautiful too, isto é uma verdade, mas se continuarem a usar leggins não são estes os comentários que vão ouvir.
All de photos are from http://rebequitasfashionblog.blogspot.pt <3
Dream Girl
***
I know that may seem strange, people should use what they feel comfortable, but this does not mean that you can use everything they desire. Not everything become good on us, we must be realistic and has for some time I've been confronted in the subway with a girl that despite having a few extra pounds she was quite cute, but the fact that she was wearing a white leggings, which you were super fair and almost transparent, as if they were pants and bothered me a little bit and if it were I honestly liked that someone tell me "that doesn't look good on you!" and they through it to the trash. I hear lots of people say "leggings are not for big girls" and well, it's true. The clothing can be a great ally but also a great enemy and I guarantee that if they know choose well what they wear and what use will rock for sure. Big girls are beautiful too, this is a fact, but if they continue to use leggings aren't these comments that they will listen.
All de photos are from http://rebequitasfashionblog.blogspot.pt <3
Dream Girl
domingo, 15 de julho de 2012
Roupas em segunda mão.
Há uns tempos atrás uma leitora deu-me a conhecer o seu blog roupasemsgundamaoparavenda.blogspot.pt e após ter dado uma espreitadela resolvi partilhá-lo com vocês. Aqui ela vende roupa, livros, entre outros acessórios, em segunda mão, por preços bastante acessíveis. Devo dizer-vos que acho uma excelente ideia porque aquilo que nós já não usamos e que temos a ocupar espaço no armário pode ser do gosto de alguém e assim pode ser uma boa maneira de fazer algum dinheiro.
Como em tudo há que ter atenção, certificar-nos de que o que estamos a comprar é de qualidade e que nos fica bem e que vamos usar, caso contrário não vale apena. O ideal seria poder encontrar-se com a pessoa para comprar pessoalmente mas caso isso não seja possível então certificar-nos de que o valor e os artigos chegam ao local desejado!
Garantindo todos estes aspectos acho que é uma ideia a divulgar e a continuar. Espreitem!
Dream Girl
quarta-feira, 15 de fevereiro de 2012
Old new trends!
Agora que aí vem a nova estação, e os saldos ainda não acabaram pode ser uma boa oportunidade para adquirir algumas peças a bom preço que podem ser utilizadas nesta estação.
Algumas peças são sempre intemporais e utilizam-se qualquer que seja a estação como alguns básicos, o vestido preto, uma camisa branca, blazers e calças pretas. Portanto se não tiverem algumas destas peças podem aproveitar. Os calções e os blusões de ganga também são peças que podem ser sempre utilizadas.
Quanto ao resto, nos estampados vão continuar a existir as bolas e nesta estação vêem-se as flores e desenhos tropicais.
As rendas serão uma das grandes apostas esta estação!
Nos acessórios podem apostar em pérolas e básicos, são intemporais e ficam sempre bem.
Dream Girl
Algumas peças são sempre intemporais e utilizam-se qualquer que seja a estação como alguns básicos, o vestido preto, uma camisa branca, blazers e calças pretas. Portanto se não tiverem algumas destas peças podem aproveitar. Os calções e os blusões de ganga também são peças que podem ser sempre utilizadas.
Quanto ao resto, nos estampados vão continuar a existir as bolas e nesta estação vêem-se as flores e desenhos tropicais.
As rendas serão uma das grandes apostas esta estação!
Nos acessórios podem apostar em pérolas e básicos, são intemporais e ficam sempre bem.
***
Now here comes the new station, and still not over balances can be a good opportunity to acquire some parts at a fair price that can be used in this season.
Some pieces are timeless and always use whatever the season as some basic, black dress, a white shirt, black trousers and blazers. So if you don't have some of these pieces can take advantage of. The shorts and denim jackets are also parts that can always be used.
As for the rest, in printed will continue to exist, the balls and this station are the flowers and tropical drawings.
Rents will be one of the big bets this season!
Accessories can bet in pearls and basic, are timeless and are always good.
Dream Girl
sexta-feira, 10 de fevereiro de 2012
look beautiful every day 14
Ontem tentei convencer-vos de que é possível andar-se bem e bonita mesmo na época de exames em que adormecemos em todo o lado. Não só a maquilhagem é importante mas também o que vestimos. Prepara o que queres vestir na noite anterior antes de te deitares pois no dia a seguir vais ter sono e pressa e acabas por vestir o que vem à mão.
Deixo duas sugestões de looks.
Neste primeiro look, opta pelas calças de ganga, confortáveis e práticas, uma t-shirt e um casaco. As sabrinas são maravilhosas porque dão um ar cuidado e são super confortáveis. Junta um colar ao teu look e vais ver como tudo parece melhor!
Para quem prefere os saltos ou quer ir bem vestido mesmo nos dias de estudo intenso ou no dia do exame, uma túnica e leggings podem ser grandes aliados!
Espero que gostem e que vos seja útil (sei que muitas faculdades já acabaram a época de exame mas a minha ainda vai na 1ª fase! Força nisso)
***
Yesterday I tried to convince you that you can walk pretty well and even at the time of exams in that you fall asleep everywhere. Not just the makeup is important but also what we wear. Prepare what you want to dress the night before, before bedtime as the day after you have sleep and hurry and finish by dressing in what comes to hand.
I leave two suggestions of looks.
In this first look, choose by jeans, comfortable and practical, a t-shirt and a jacket. The ballerinas are wonderful because they give an air care and are super comfortable. Joins a necklace to your look and you'll see how everything looks better!
For those who prefer the jumps or wants to go well dressed even in the days of intense study or on the day of the examination, a tunic and leggings can be great allies!
I hope you enjoy and that you find it useful (I know that many colleges have already ended the time of examination but my still going on stage! Strength of it)
Dream Girl
quarta-feira, 8 de fevereiro de 2012
Sobrancelhas
As sobrancelhas são uma parte importante do nosso rosto, tê-las sempre arranjadinhas dá logo outro ar à pessoa. Elas conferem estrutura, "emolduram" os olhos e determinam a expressão do nosso olhar!
Como em tudo, são diferentes em cada pessoa e, quando as arranjamos, elas devem manter um ar natural, de forma a que não fiquemos a parecer demasiado artificiais!
Existem várias formas de arranjar as sobrancelhas: pinça, cera, tesoura ou linha. Confesso que apenas experimentei a primeira, tanto em casa como numa esteticista.
Para quem gosta de arranjar as suas próprias sobrancelhas, aqui ficam algumas dicas:
- O melhor método passa por primeiro desenhá-las com um lápis branco e depois retirar os pêlos que ficam fora dessa linha.
- Para traçar as linhas, devem fazer-se 4 medições, como na imagem abaixo, em que:
A: encoste o lápis ao lado exterior do nariz e alinhe pelo canto interior do olho. É nessa zona que deve terminar a parte interna da sobrancelha mas, NÃO retire excessivamente. O pêlo com um aspecto rebelde nesta zona dá um ar mais natural.
B: com o lápis alinhado pelo nariz centre pela íris. Aí deve ficar o ponto alto do arco da sobrancelha. Uma coisa que não costumo fazer é retirar pêlos acima da sobrancelha, pois assim o arco fica o mais natural possível.
C: com o lápis encostado ao nariz, alinhe pelo canto exterior do olho e será aí que a sobrancelha deve terminar. Não se preocupem se não der certo. A minha linha acaba depois de a minha sobrancelha acabar, existem sempre algumas excepções!
- Os pêlos devem ser retirados um a um, no sentido do crescimento do pêlo.
- No caso de ter os pêlos, demasiado compridos pode cortá-los com uma tesoura para a sobrancelha ficar mais bem penteada (nunca fiz isto, não me parece lá muito seguro a não ser que se tenha experiência!)
- Não é aconselhável aplicar creme ou óleo antes de arranjar as sobrancelhas, mas pode e deve-se colocar um tónico refrescante ou um pouco de gelo e fazê-lo à noite, para ter tempo de recuperar durante a noite, principalmente se a sua pele tiver tendência a ficar vermelha.
- Não esquecer de pentear a sobrancelha enquanto se está a depilá-la!
Eyebrows are an important part of our face, have them always arranged gives another soon your look. They confer structure, they "frame" our eyes and determine the expression of our look!
As with everything, they are different in each person and, when they are arranged, they must maintain a natural air, so that we do not seem too artificial!
There are several ways to arrange the eyebrows: tweezer, wax, scissors or line. I confess I only experienced the first, both at home and a beautician.
For those who like to arrange their own eyebrows, here are some tips:
-The best method is to first draw them with a white pencil and then remove the hairs that fall outside that line.
-To draw the lines, should be 4 measurements, as pictured below, in which:
A: touches the pencil to the outer side of the nose and align the inner corner of the eye. This is the zone that should end the inner part of the eyebrow but do not remove excessively. The hair with a rebellious aspect in this area gives a natural look.
B: with the pencil line by nose centre by the iris. There should be the high point of the arc of the eyebrow. One thing that doesn't usually do is withdraw hairs above the eyebrow, because the arc is the most natural possible.
C: with the pencil leaning against the nose, align by outer corner of the eye and is where the eyebrow should end. Don't worry if it is unsuccessful. My row ends after my eyebrow ending, there are always exceptions!
-The hair must be removed one by one, in the direction of hair growth.
-If the hairs are too long you can cut them with scissors for eyebrow stay more well combed (I've never did this, I do not think there is very secure unless you have experience!)
-It is not advisable to apply cream or oil before arranging the eyebrows, but you can and should put a refreshing tonic or a little ice and do it at night, to take time to recover during the night, especially if your skin has a tendency to stay red.
-Don't forget to comb the eyebrow while you are doing this!
Dream Girl
Como em tudo, são diferentes em cada pessoa e, quando as arranjamos, elas devem manter um ar natural, de forma a que não fiquemos a parecer demasiado artificiais!
Existem várias formas de arranjar as sobrancelhas: pinça, cera, tesoura ou linha. Confesso que apenas experimentei a primeira, tanto em casa como numa esteticista.
Para quem gosta de arranjar as suas próprias sobrancelhas, aqui ficam algumas dicas:
- O melhor método passa por primeiro desenhá-las com um lápis branco e depois retirar os pêlos que ficam fora dessa linha.
- Para traçar as linhas, devem fazer-se 4 medições, como na imagem abaixo, em que:
A: encoste o lápis ao lado exterior do nariz e alinhe pelo canto interior do olho. É nessa zona que deve terminar a parte interna da sobrancelha mas, NÃO retire excessivamente. O pêlo com um aspecto rebelde nesta zona dá um ar mais natural.
B: com o lápis alinhado pelo nariz centre pela íris. Aí deve ficar o ponto alto do arco da sobrancelha. Uma coisa que não costumo fazer é retirar pêlos acima da sobrancelha, pois assim o arco fica o mais natural possível.
C: com o lápis encostado ao nariz, alinhe pelo canto exterior do olho e será aí que a sobrancelha deve terminar. Não se preocupem se não der certo. A minha linha acaba depois de a minha sobrancelha acabar, existem sempre algumas excepções!
- No caso de ter os pêlos, demasiado compridos pode cortá-los com uma tesoura para a sobrancelha ficar mais bem penteada (nunca fiz isto, não me parece lá muito seguro a não ser que se tenha experiência!)
- Não é aconselhável aplicar creme ou óleo antes de arranjar as sobrancelhas, mas pode e deve-se colocar um tónico refrescante ou um pouco de gelo e fazê-lo à noite, para ter tempo de recuperar durante a noite, principalmente se a sua pele tiver tendência a ficar vermelha.
- Não esquecer de pentear a sobrancelha enquanto se está a depilá-la!
***
As with everything, they are different in each person and, when they are arranged, they must maintain a natural air, so that we do not seem too artificial!
There are several ways to arrange the eyebrows: tweezer, wax, scissors or line. I confess I only experienced the first, both at home and a beautician.
For those who like to arrange their own eyebrows, here are some tips:
-The best method is to first draw them with a white pencil and then remove the hairs that fall outside that line.
-To draw the lines, should be 4 measurements, as pictured below, in which:
A: touches the pencil to the outer side of the nose and align the inner corner of the eye. This is the zone that should end the inner part of the eyebrow but do not remove excessively. The hair with a rebellious aspect in this area gives a natural look.
B: with the pencil line by nose centre by the iris. There should be the high point of the arc of the eyebrow. One thing that doesn't usually do is withdraw hairs above the eyebrow, because the arc is the most natural possible.
C: with the pencil leaning against the nose, align by outer corner of the eye and is where the eyebrow should end. Don't worry if it is unsuccessful. My row ends after my eyebrow ending, there are always exceptions!
-The hair must be removed one by one, in the direction of hair growth.
-If the hairs are too long you can cut them with scissors for eyebrow stay more well combed (I've never did this, I do not think there is very secure unless you have experience!)
-It is not advisable to apply cream or oil before arranging the eyebrows, but you can and should put a refreshing tonic or a little ice and do it at night, to take time to recover during the night, especially if your skin has a tendency to stay red.
-Don't forget to comb the eyebrow while you are doing this!
| Nicole Kidman |
| Angelina Jolie |
Dream Girl
quarta-feira, 25 de janeiro de 2012
Cabelos oleosos!
Hoje fala-vos sobre cabelos oleosos. Não sei se sofrem deste problema, eu não tenho um cabelo propriamente oleoso mas também não dura lá muito tempo sem o lavar!
Como sabem existem imensos mitos sobre este assunto e há coisas que é importante esclarecer.
- Tocar com as mãos no cabelo muitas vezes aumenta a oleosidade. - É verdade. As nossas mãos mexem em tudo por isso vão possuir imensa sujidade e resíduos, mesmo que as estejamos sempre a lavar. Se passarmos as mãos no cabelo esses resíduos vão passar para lá acumulando-se e por isso o cabelo fica mais sujo e oleoso. Tenta não mexer muito no cabelo!
- A caspa é uma caracteristica exclusiva dos cabelos oleosos. - Não é verdade. A caspa é um problema do couro cabeludo em geral, e não necessariamente do típico couro cabeludo oleoso. Contudo, o excesso de sebo pode favorecer o seu aparecimento, especialmente se houver resíduos de champô e condicionador. Secar o cabelo com secador e evitar dormir com o cabelo molhado contribui para a diminuição da caspa.
- Quem tem o cabelo oleoso não pode usar “leave-in”- Não é verdade. A oleosidade aumenta apenas se o produto for colocado na raiz dos cabelos. Contudo, se colocado a partir do meio até às pontas, aumenta o brilho e deixa os cabelos protegidos contra o excesso de poluição e dos raios ultra violetas!
- Os cabelos oleosos não precisam de hidratação. - Uma grande mentira. Este tipo de cabelo também precisa de hidratação, principalmente para evitar o seu enfraquecimento. Mais uma vez, o ideal é usar produtos específicos para aplicar do meio do cabelo até às pontas.
- Apenas os cabelos lisos são oleosos. - Falso. Os cabelos finos, lisos e pouco volumosos tendem a ser oleosos. Mas os cabelos mais fortes e ondulados também podem sofrer do mesmo problema. A diferença é que as ondas e muitas vezes, o frizz impedem a fácil progressão do sebo pelo comprimento dos cabelos, concentrando-se apenas na raiz e por isso não se nota tanto.
- Lenços e bonés aumentam a oleosidade. - Correto. Quando o couro cabeludo é abafado, acontece um aumento da produção natural de oleosidade. Quem já tem este problema deve evitar a utilização excessiva deste tipo de acessórios.
- Os cabelos oleosos crescem mais rapidamente. - Falso. O crescimento do cabelo está diretamente relacionado com o DNA e a alimentação. O facto dos cabelos serem oleosos, normais ou secos nada tem a ver com o crescimento rápido ou não dos cabelos.
O champoô que utilizo é este:
É suave, cheira bem, faz o seu trabalho e é amigo do ambiente.
Normalmente gosto de ir trocando mas já tenho este há algum tempo, não me tem desiludido.
Se tens um cabelo oleoso deves usar produtos adequados ao teu tipo de cabelo, ir experimentando é uma boa opção, por vezes o que se dá bem connosco pode não se dar com outra pessoa. Quando encontrares o perfeito para ti, fica por esse!
***
Today I'm going to talk to you about oily hair. I don't know if you suffer from this problem, I don't have a real oily hair but also doesn't last long there without the wash!
As you know there are many myths about this subject and there are things that is important to clarify.
- Touching with the hands in the hair often increases the oils. -It is true. Our hands move at all so it will have immense dirt and residues, even though we are always to wash. If we move the hands in the hair of these wastes will move beyond accumulate and so the hair becomes more dirty and oily. Try not to stir much in hair!
- Dandruff is a unique characteristic of oily hair. -It is not true. Dandruff is a scalp problem in General and not necessarily the typical oily scalps. However, the excess of sebum can enhance your appearance, especially if there are residues of shampoo and conditioner. Dry the hair with a hairdryer and avoid sleep with wet hair contributes to the reduction of dandruff.
- Those who have oily hair cannot use "leave-in"-it is not true. The oil increases only if the product is placed in the root of the hair. However, if placed from means to ends, increases the shine and leaves hair protected against excess pollution and ultraviolet Ray!
- The oily hair doesn't need hydration. -A big lie. This type of hair also needs hydration, mainly to avoid its weakening. Once again, the ideal is to use specific products to apply the middle of the hair up on tips.
- Only the straight hair are oily. -False. The fine hair, smooth and little bulky tend to be oily. But the strongest and wavy hair can also suffer from the same problem. The difference is that the waves, and the frizz often prevent easy progression of tallow by length of hair, concentrating only on the root and therefore not note much.
- Scarves and caps increase the oil. -Correct. When the scalp is muffled, happens an increased production of natural oils. Who already has this problem should avoid excessive use of this type of accessories.
- The oily hair grow faster. -False. Hair growth is directly related to the DNA and feeding. The fact that the hair be oily, normal or dry has nothing to do with the rapid growth of hair or not.
The champoô that I use is this: It is gentle, smells well, does its job and is environmentally friendly.
Normally I like to go swapping but I already have this for some time, I do not have disappointed.
If you have an oily hair will use appropriate products to your hair type, go trying is a good option, sometimes that gets along with us may not be with someone else. When you find the perfect for you, is this!
Dream Girl
quinta-feira, 12 de janeiro de 2012
esfoliação caseira
Primeiro que tudo dreamers devo-vos um pedido de desculpa por não ter publicado isto ontem. Há tanta coisa por fazer e tive de ir tratar do meu estágio (burocracias atrás de burocracias) é sempre assim, pelo que acabei por não ter grande tempo.
Como as quartas-feiras são dias para cuidar de mim própria, hoje venho falar-vos de um ritual importante para a beleza e saúde da nossa pele: esfoliação!
A esfoliação é importante porque as células da nossa pele se replicam constantemente e por isso acumulam-se células mortas na camada mais superficial, que é importante ir removendo, principalmente se sofres deste grande mal, pêlos encravados.
Como a economia não está fácil e nem sempre conseguimos encontrar um creme que seja do nosso agrado, deixo-vos algumas receitas de cremes esfoliantes que podem fazer em casa com ingredientes do nosso dia-a-dia.
O mais simples de todos passa por deitar 2 colheres de açúcar no gel de banho diário. Depois existem outros que são mais específicos para o tipo de pele e que utilizam outros ingredientes.
-Esfoliante de café:
2 chávenas grandes de café moído
meia chávena de açúcar refinado ou sal marinho
2-3 colheres de chá de óleo de massagem neutro
- Esfoliante para pele oleosa:
1 colher de sopa de açúcar
1 colher de sopa de mel
- Esfoliante para pele seca:
1 colher de sopa de flocos de aveia
1 colher de sopa de mel
Para quem confia mais nos cremes comprados. Actualmente estou a usar estes dois:
Sou muito sincera e também não conheço muitos outros por isso não tenho grande comparação, mas parecem-me ser bons. Prometo-vos que se encontrar alguns melhores aviso!
A esfoliação deve ser feita pelo menos 1 vez por semana, depois de ter limpo a pele.
First of all dreamersI owe you an apology for not having posted this yesterday. There is so much to be done and I had to go deal with my internship (bureaucracies behind bureaucracies) is always like that, so I ended up not having great time.
As the Wednesdays are days to take care of myself, today I tell you of an important ritual for beauty and health of our skin: exfoliation!
Exfoliation is important because our skin cells constantly replicating and so accumulate dead cells in the most superficial layer, it is important to go removing, especially if sofres this great evil, ingrown hairs.
As the economy is not easy and not always managed to find a cream that is of our liking, I leave you some recipes of exfoliating creams that can do at home with ingredients from our day to day.
The simplest of all passes through pour 2 tablespoons of sugar in daily shower gel. Then there are others that are more specific to the type of skin and using other ingredients.
-Coffee Exfoliant:
2 cups of coffee, ground
a half cup of refined sugar or sea salt
2-3 teaspoons of neutral massage oil
-Exfoliant for oily skin:
1 tablespoon of sugar
1 tablespoon of honey
-Exfoliant for dry skin:
1 tablespoon rolled oats
1 tablespoon of honey
For those who trust more in creams bought. Currently I am using these two:
I am very sincere and also do not know many others so I'm not a great comparison, but seem to me to be good. I promise you that if I find some better I will tell you!
Exfoliation should be made at least 1 time per week, after having cleaned skin.
Dream Girl
Como as quartas-feiras são dias para cuidar de mim própria, hoje venho falar-vos de um ritual importante para a beleza e saúde da nossa pele: esfoliação!
A esfoliação é importante porque as células da nossa pele se replicam constantemente e por isso acumulam-se células mortas na camada mais superficial, que é importante ir removendo, principalmente se sofres deste grande mal, pêlos encravados.
Como a economia não está fácil e nem sempre conseguimos encontrar um creme que seja do nosso agrado, deixo-vos algumas receitas de cremes esfoliantes que podem fazer em casa com ingredientes do nosso dia-a-dia.
O mais simples de todos passa por deitar 2 colheres de açúcar no gel de banho diário. Depois existem outros que são mais específicos para o tipo de pele e que utilizam outros ingredientes.
-Esfoliante de café:
2 chávenas grandes de café moído
meia chávena de açúcar refinado ou sal marinho
2-3 colheres de chá de óleo de massagem neutro
- Esfoliante para pele oleosa:
1 colher de sopa de açúcar
1 colher de sopa de mel
- Esfoliante para pele seca:
1 colher de sopa de flocos de aveia
1 colher de sopa de mel
Para quem confia mais nos cremes comprados. Actualmente estou a usar estes dois:
Sou muito sincera e também não conheço muitos outros por isso não tenho grande comparação, mas parecem-me ser bons. Prometo-vos que se encontrar alguns melhores aviso!
A esfoliação deve ser feita pelo menos 1 vez por semana, depois de ter limpo a pele.
***
First of all dreamersI owe you an apology for not having posted this yesterday. There is so much to be done and I had to go deal with my internship (bureaucracies behind bureaucracies) is always like that, so I ended up not having great time.
As the Wednesdays are days to take care of myself, today I tell you of an important ritual for beauty and health of our skin: exfoliation!
Exfoliation is important because our skin cells constantly replicating and so accumulate dead cells in the most superficial layer, it is important to go removing, especially if sofres this great evil, ingrown hairs.
As the economy is not easy and not always managed to find a cream that is of our liking, I leave you some recipes of exfoliating creams that can do at home with ingredients from our day to day.
The simplest of all passes through pour 2 tablespoons of sugar in daily shower gel. Then there are others that are more specific to the type of skin and using other ingredients.
-Coffee Exfoliant:
2 cups of coffee, ground
a half cup of refined sugar or sea salt
2-3 teaspoons of neutral massage oil
-Exfoliant for oily skin:
1 tablespoon of sugar
1 tablespoon of honey
-Exfoliant for dry skin:
1 tablespoon rolled oats
1 tablespoon of honey
For those who trust more in creams bought. Currently I am using these two:
I am very sincere and also do not know many others so I'm not a great comparison, but seem to me to be good. I promise you that if I find some better I will tell you!
Exfoliation should be made at least 1 time per week, after having cleaned skin.
Dream Girl
quarta-feira, 4 de janeiro de 2012
Manicure caseira!
A quarta feira é o dia em que eu aproveito para ficar em casa de manhã e tratar de mim própria. Também merecemos uns miminhos de vez em quando.
A manicure é uma das coisas que faço neste dia. Assim, como é extremamente fácil ter mãos bonitas em casa deixo-vos algumas dicas e truques para o fazerem!
- enche dois copos com água bem quente (o máximo que conseguirem aguentar);
- quando a água começar a ficar fria retira as mãos e limpa-as com uma toalha macia;
- retira os restos de verniz das unhas com um algodão e dissolvente (de preferência sem acetona);
- corta as unhas e lima-as sempre na mesma direcção!;
- puxa para bainho as cutículas para que as unhas fiquem mais definidas (para as amolecer podes utilizar um pouco de água ou então algodão embebido em glicerina ou azeite);
- não retires as cutículas, se o pretenderes fazer recorre a uma especialista!;
- coloca um pouco de creme nas mãos e espalha bem;
- escolhe um verniz e pinta as unhas (duas camadas e mais uma de verniz capa no final, se desejares);
- deixa secar bem o verniz para que não se estrague quando tocares em alguma coisa.
Divirtam-se!
The Wednesday is the day that I take this opportunity to stay at home in the morning and treat myself. Also deserve a patting once in a while.
The manicure is one of the things I do on this day, so how is extremely easy to have beautiful hands at home I leave you some tips and tricks for doing it!
-fills two glasses with hot water (the maximum that can withstand);
-When water start getting cold withdraw your hands of the water and clean them with a soft towel;
-Remove the remains of nail varnish with a cotton and solvent (preferably without acetone);
-cut the nails and file them always in the same direction!;
-pulls bainho cuticles so that the nails are more defined (to soften you can use a little water or cotton soaked in Glycerin or oil);
-not retires the cuticles, if you wish to do that use a specialist!;
-puts a little cream on hands and spreads well;
-choose a varnish and paints the nails (two layers and more a varnish cover at the end, if you wish);
- leaves the veneer drying.
Enjoy yourself!
Dream Girl
A manicure é uma das coisas que faço neste dia. Assim, como é extremamente fácil ter mãos bonitas em casa deixo-vos algumas dicas e truques para o fazerem!
- enche dois copos com água bem quente (o máximo que conseguirem aguentar);
- quando a água começar a ficar fria retira as mãos e limpa-as com uma toalha macia;
- retira os restos de verniz das unhas com um algodão e dissolvente (de preferência sem acetona);
- corta as unhas e lima-as sempre na mesma direcção!;
- puxa para bainho as cutículas para que as unhas fiquem mais definidas (para as amolecer podes utilizar um pouco de água ou então algodão embebido em glicerina ou azeite);
- não retires as cutículas, se o pretenderes fazer recorre a uma especialista!;
- coloca um pouco de creme nas mãos e espalha bem;
- escolhe um verniz e pinta as unhas (duas camadas e mais uma de verniz capa no final, se desejares);
- deixa secar bem o verniz para que não se estrague quando tocares em alguma coisa.
Divirtam-se!
***
The Wednesday is the day that I take this opportunity to stay at home in the morning and treat myself. Also deserve a patting once in a while.
The manicure is one of the things I do on this day, so how is extremely easy to have beautiful hands at home I leave you some tips and tricks for doing it!
-fills two glasses with hot water (the maximum that can withstand);
-When water start getting cold withdraw your hands of the water and clean them with a soft towel;
-Remove the remains of nail varnish with a cotton and solvent (preferably without acetone);
-cut the nails and file them always in the same direction!;
-pulls bainho cuticles so that the nails are more defined (to soften you can use a little water or cotton soaked in Glycerin or oil);
-not retires the cuticles, if you wish to do that use a specialist!;
-puts a little cream on hands and spreads well;
-choose a varnish and paints the nails (two layers and more a varnish cover at the end, if you wish);
- leaves the veneer drying.
Enjoy yourself!
Dream Girl
Subscrever:
Mensagens (Atom)